
Last Updated on February 28, 2024 by Paresh Gupta
Year 2024 started with a new project–build a new cluster of many servers. The basic requirement was to install OS on these servers. Manual installation wasn’t an option because that would take a long time. In addition, I might have to re-built everything multiple times, so the time and effort would multiply. I had used PXE boot, but I was looking for an improved solution. I am glad, I found MAAS for automatic PXE boot.
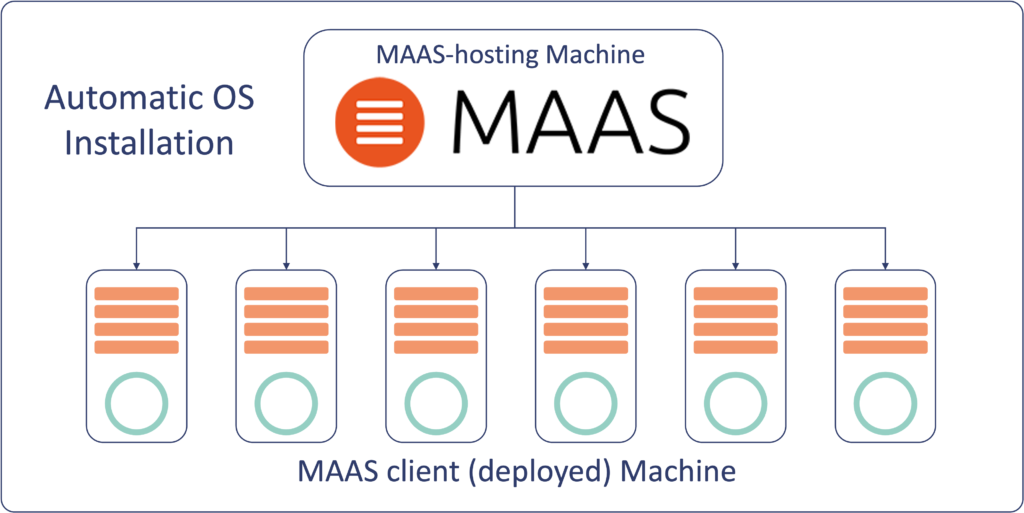
This post is about how I use Metal as a Service, MAAS for automatic PXE boot to install OS on many servers. MAAS can do much more and has integration with other configuration and provisioning tools, but I used it only for OS installation. I am writing this post for myself in the future, or anyone else who wants to achieve similar. You can also read about Automate password less SSH between thousands of linux servers.
How MAAS works for Automatic PXE Boot
MAAS for automatic PXE boot, first needs a server to run itself. This server can be bare metal or a VM. See MAAS documentation for various options. This MAAS-hosting server must be installed manually. I used Ubuntu 22.04 for this purpose.
You can read about how MAAS works from its website. The following is a short explanation.
Discovering a Client Machine
When a (client) machine boots, it tries to looks for DHCP server. MAAS (assuming it’s running and connected to the same network) has a built-in DCHP server (or allows using an external DCHP server) which provides IP address and other DCHP options for PXE boot to the client machine.
State of a Client Machine–New or Enlistment
The client machine boots, MAAS gathers information, and shuts it down. This is known as Enlisting of the machine in MAAS.
State of a Client Machine–Commissioned
Then, go and Commission the client machine from MAAS, which boots the client machine and shuts it down again. This brings the client machine to Commissioned state.
State of a Client Machine–Allocated
Then allocate the client machine.
State of a Client Machine–Deployed
Finally, deploy the client machine. MAAS powers up the client machine and deploys OS on it. That would complete the steps on MAAS for automatic PXE boot of the client machines.
These stages require MAAS to control power to the client machine. Alternatively, power can be controlled manually.
MAAS Installation
Refer to MAAS installation steps for the latest. I followed these steps to install MAAS using snap.
paresh@ubuntu-vm-107-1:~$ sudo snap install --channel=3.4 maas
[sudo] password for paresh:
maas (3.4/stable) 3.4.0-14321-g.1027c7664 from Canonical✓ installed
paresh@ubuntu-vm-107-1:~$ sudo maas status
MAAS is not configured
It may take a few minutes to download and install MAAS.
Disable Timesyncd
Ubuntu’s default timesyncd may conflict with MAAS built-in chrony, so disable it.
ciscouser@ubuntu-vm-107-1:~$ sudo systemctl stop systemd-timesyncd
paresh@ubuntu-vm-107-1:~$ sudo systemctl disable systemd-timesyncd
Removed /etc/systemd/system/sysinit.target.wants/systemd-timesyncd.service.
Removed /etc/systemd/system/dbus-org.freedesktop.timesync1.service.
paresh@ubuntu-vm-107-1:~$
Install PostgreSQL Database
sudo apt update -y
sudo apt install -y postgresql
Configure PostgreSQL for MAAS
Decide the following variables. No need to set them though.
export MAAS_DBUSER=maas
export MAAS_DBPASS=nbv_12345
export MAAS_DBNAME=maas
export HOSTNAME=localhost
Just use the right values in the following steps.
Create a PostgreSQL user.
sudo -i -u postgres psql -c "CREATE USER \"maas\" WITH ENCRYPTED PASSWORD 'nbv_12345'"Create the MAAS database.
sudo -i -u postgres createdb -O "maas" "maas"Edit /etc/postgresql/14/main/pg_hba.conf and add a line for the newly created database.
host maas maas 0/0 md5
echo "host maas maas 0/0 md5" | sudo tee -a /etc/postgresql/14/main/pg_hba.confInitialize MAAS:
sudo maas init region+rack --database-uri "postgres://maas:nbv_12345@localhost/maas"See below.
paresh@ubuntu-vm-107-1:~$ sudo maas init region+rack --database-uri "postgres://maas:nbv_12345@localhost/maas"
MAAS URL [default=http://172.22.36.80:5240/MAAS]:
MAAS has been set up.

If you want to configure external authentication or use
MAAS with Canonical RBAC, please run

sudo maas configauth

To create admins when not using external authentication, run

sudo maas createadmin

To enable TLS for secured communication, please run

sudo maas config-tls enable

paresh@ubuntu-vm-107-1:~$
Create MAAS Admin
You must enter an email. SSH keys can be entered later via GUI.
paresh@ubuntu-vm-107-1:~$ sudo maas createadmin
Username: admin
Password:
Again:
Email: myemail@mail.com
Import SSH keys [] (lp:user-id or gh:user-id):
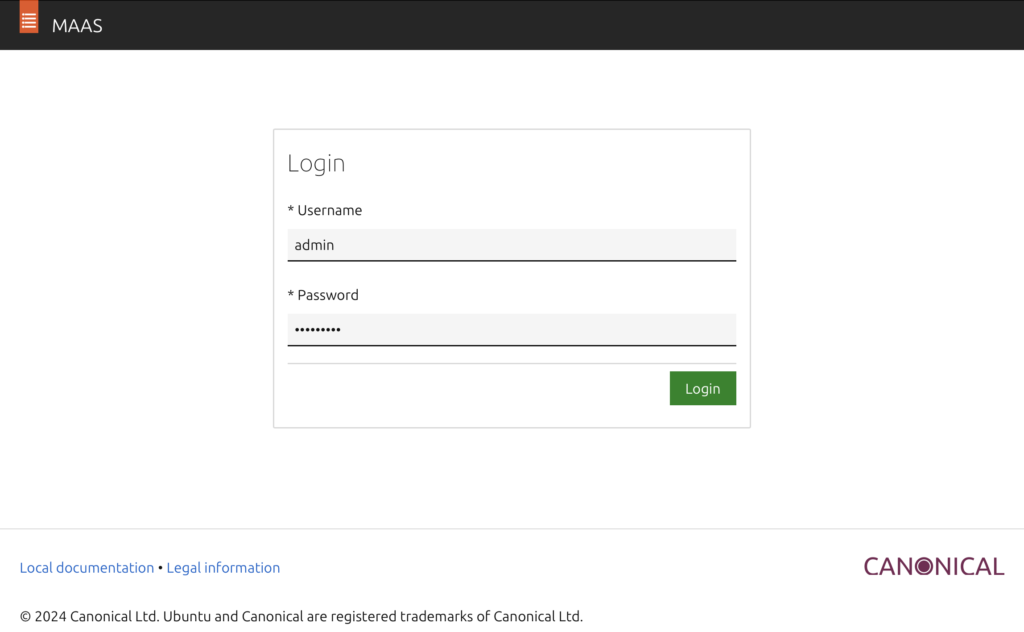
paresh@ubuntu-vm-107-1:~$MAAS Configuration via GUI
Access MAAS GUI using http://<IP of MAAS-hosting server>:5240/MAAS.
Use credentials created using the command “maas createadmin”
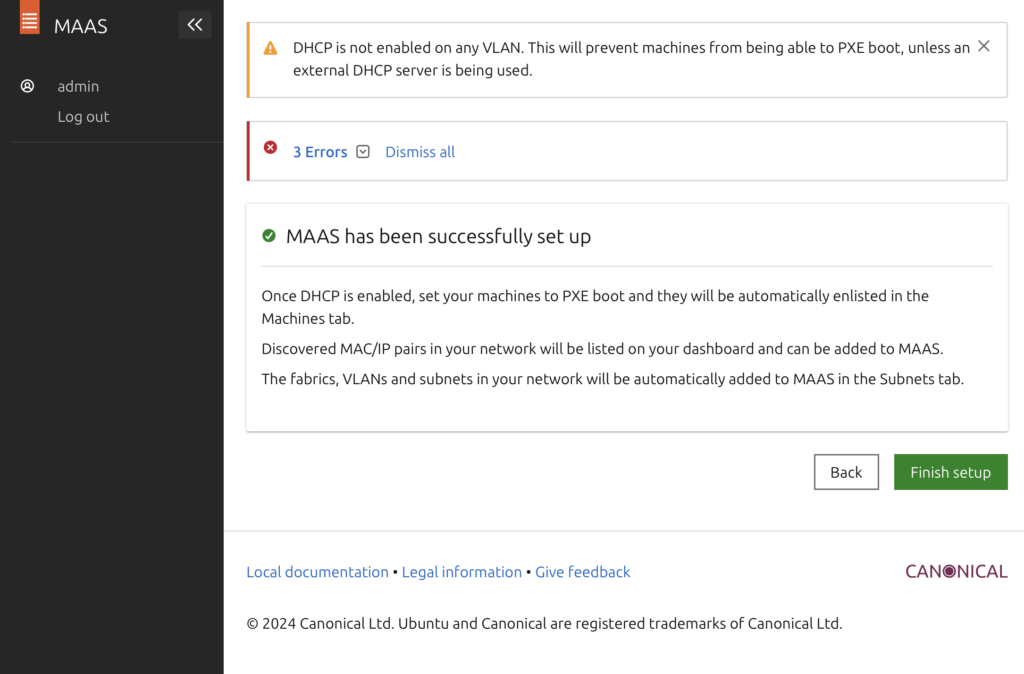
After login MAAS shows some error on the top. Ignore them for now. As we configure, these errors will go away.
Enter Region name. It can be any string.
Add DNS forwarder. MAAS will make itself as the primary DNS on the deployed machines and use these DNS server for forwarding the requests. But I configured the deployed machines later to use a DNS server of my choice instead of MAAS.
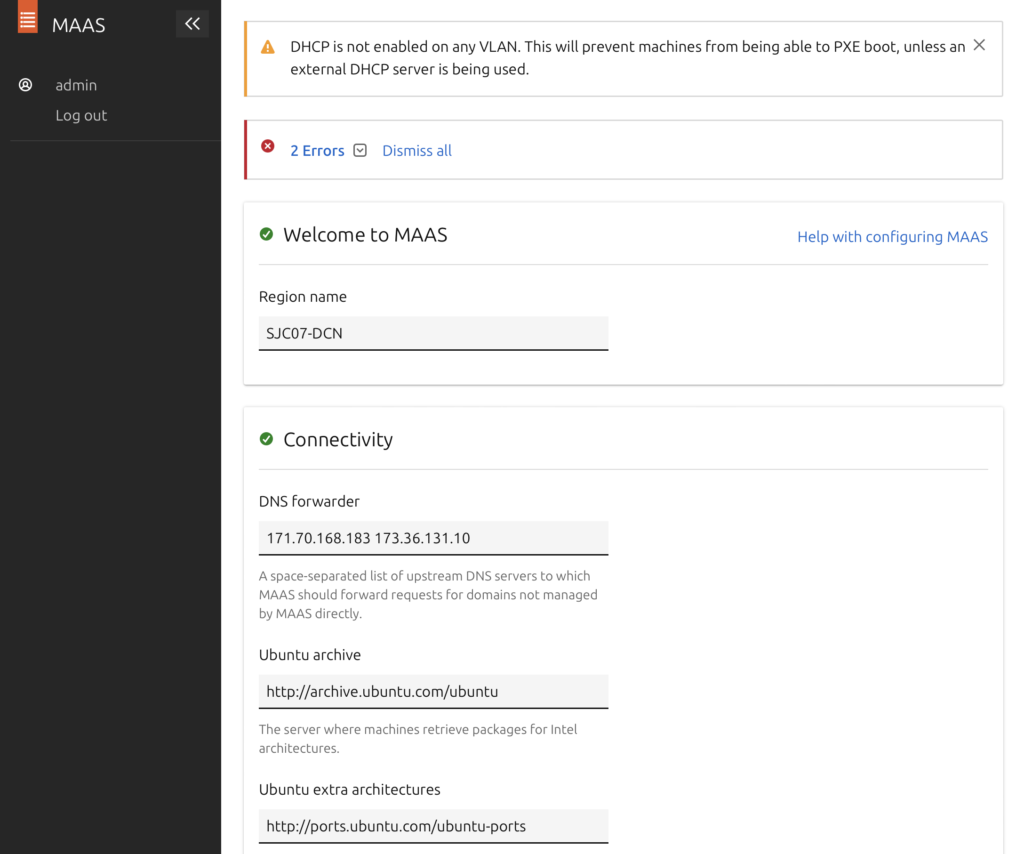
Ubuntu archive – Leave it to default.
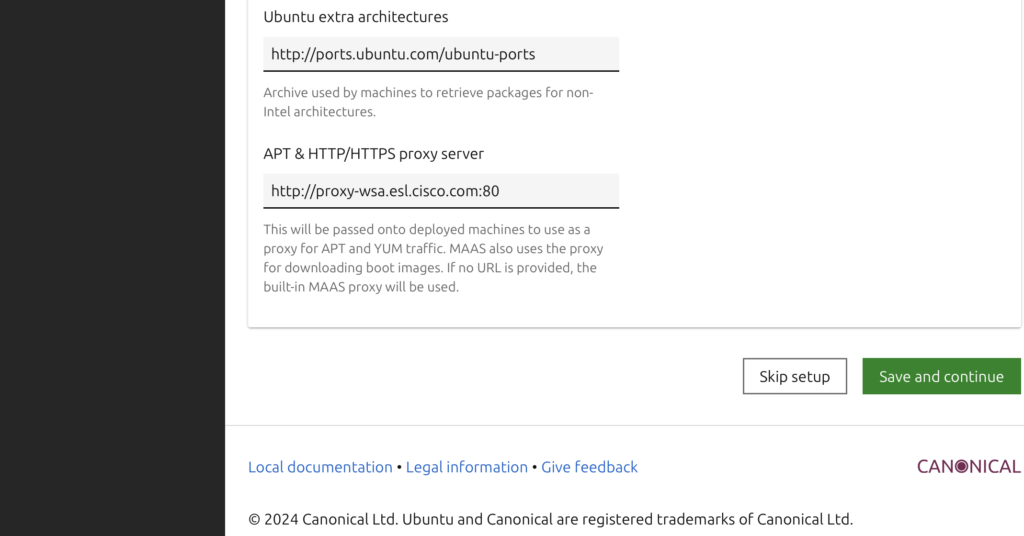
Ubuntu extra architectures – Leave it to default.
APT & HTTP/HTTPS proxy server – Add if your environment needs a proxy server to reach the Internet
Click ‘Save and Continue’
On the next page
Choose source – Leave it to default (maas.io)
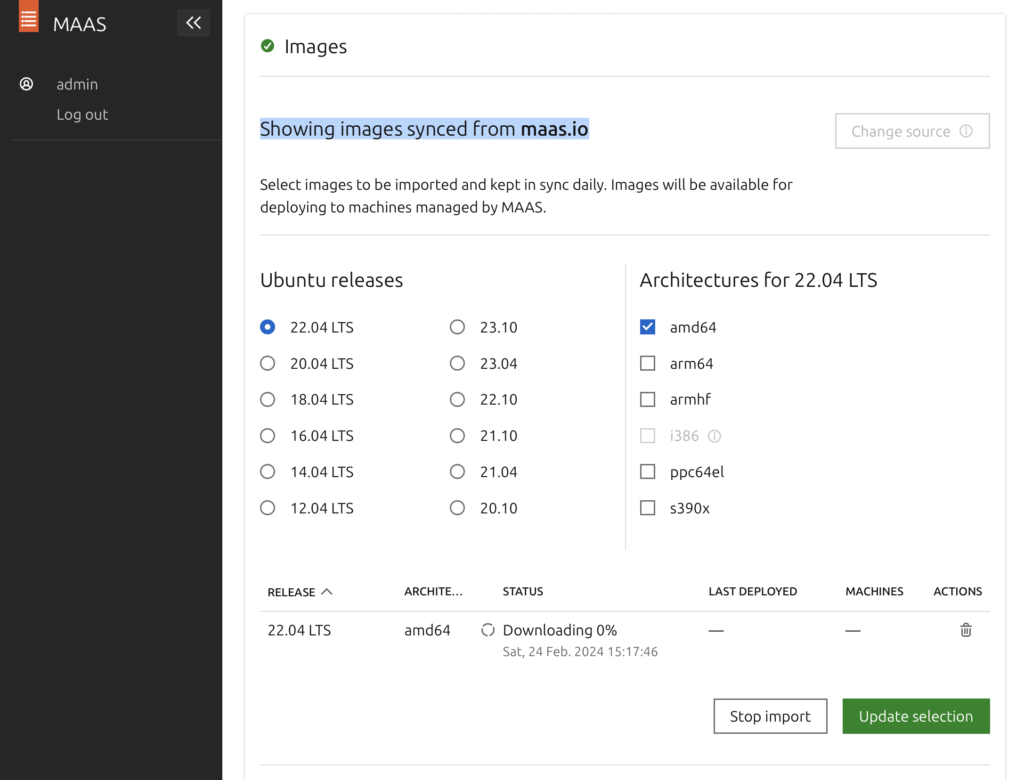
Images
Select the Ubuntu images. MAAS will download the images automatically and keep them ready to be deployed.
I selected 22.04 LTS and amd64
Click on Update Selection and Continue
Next page should show “MAAS has been successfully set up”. Click Finish setup.
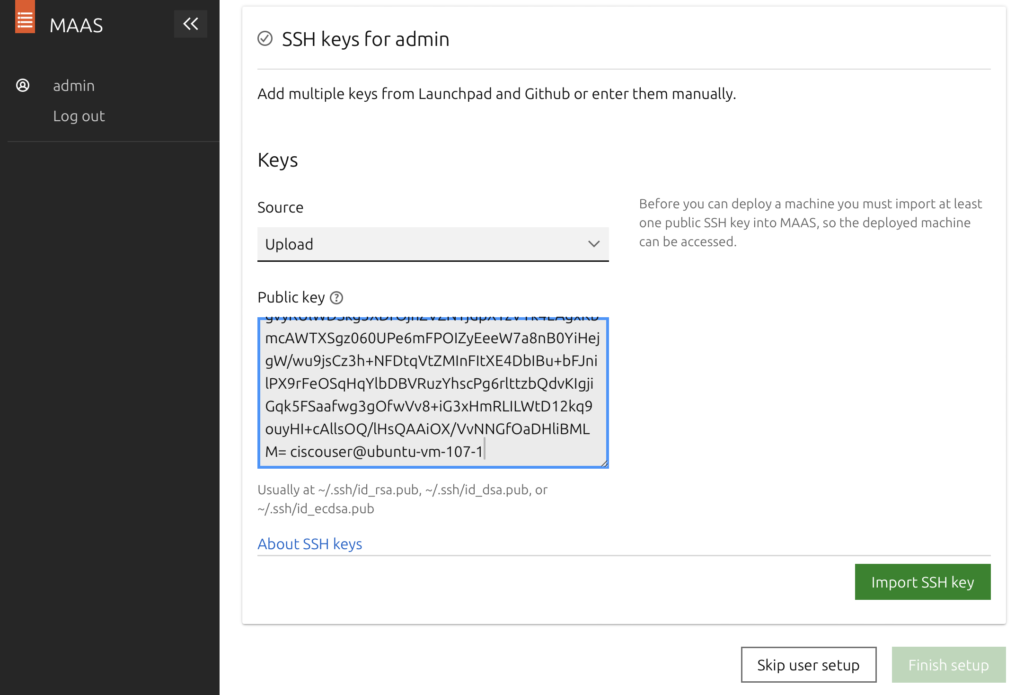
Adding SSH Keys in MAAS
This is mandatory. Without this, you won’t be able to login to the deployed machine.
MAAS will copy these SSH keys to the deployed machine and will only allow login using these keys. To generate these, SSH to the MAAS-hosted machine (Ubuntu) and run the command ssh-keygen. Leave the passphrase empty.
paresh@ubuntu-vm-107-1:~$ ssh-keygen
Generating public/private rsa key pair.
Enter file in which to save the key (/home/paresh/.ssh/id_rsa):
Created directory '/home/paresh/.ssh'.
Enter passphrase (empty for no passphrase):
Enter same passphrase again:
Your identification has been saved in /home/paresh/.ssh/id_rsa
Your public key has been saved in /home/paresh/.ssh/id_rsa.pub
The key fingerprint is:
SHA256:Y4zkcE0WLHFtCyPi3ExYhtZohrsyypPZxRoy6IdQedk paresh@ubuntu-vm-107-1
The key's randomart image is:
+---[RSA 3072]----+
|   . *+o=o       |
|  . O.==+ o      |
|   O.Boo.+ .     |
|  + ==Eo  .      |
|.. o. o S        |
|=o.. o . .       |
|=oB +            |
|.B +             |
|  o              |
+----[SHA256]-----+
paresh@ubuntu-vm-107-1:~$
paresh@ubuntu-vm-107-1:~$ cat ~/.ssh/id_rsa.pub
ssh-rsa AAAAB3NzaC1yc2EAAAADAQABAAABgQCR8T/FTQPp9F5Ag4hVKDY8WsRl7kpmfWCVM2GFwe4FESDLiCvgQ0JHgFcK3PNZIr1VSc7ZI/B2CVH3mH+AiHCh8pbYGM0nV9u/y3SdJI7aEdQHfqrb/sdh2FrF12Uwl2SL/qwQMdfa37BnEhGz/Q4BRyyMqiGHCeIHFkfRikPqD0jGmvMgRQ6kvZSun8x6fPS1LYprUVC3T2HOD5zLwaQzPP7By6ICfa57Ge71n4GIeKMwMhFW6XrHdAbfaYlp7h8hcDyan3goq6EAOZz47gvyRUlWDSkg5XDfOjnZVZNYjdpXTzVYk4LAgxKbmcAWTXSgz060UPe6mFPOIZyEeeW7a8nB0YiHejgW/wu9jsCz3h+NFDtqVtZMInFItXE4DbIBu+bFJnilPX9rFeOSqHqYlbDBVRuzYhscPg6rlttzbQdvKIgjiGqk5FSaafwg3gOfwVv8+iG3xHmRLILWtD12kq9ouyHI+cAllsOQ/lHsQAAiOX/VvNNGfOaDHliBMLM= paresh@ubuntu-vm-107-1
paresh@ubuntu-vm-107-1:~$
Public keys should be in ~/.ssh/id_rsa.pub. On MAAS GUI, for Keys > Source, select Upload and paste the keys in Public Key box. Click ‘Import SSH Key’ followed by ‘Finish Setup’.
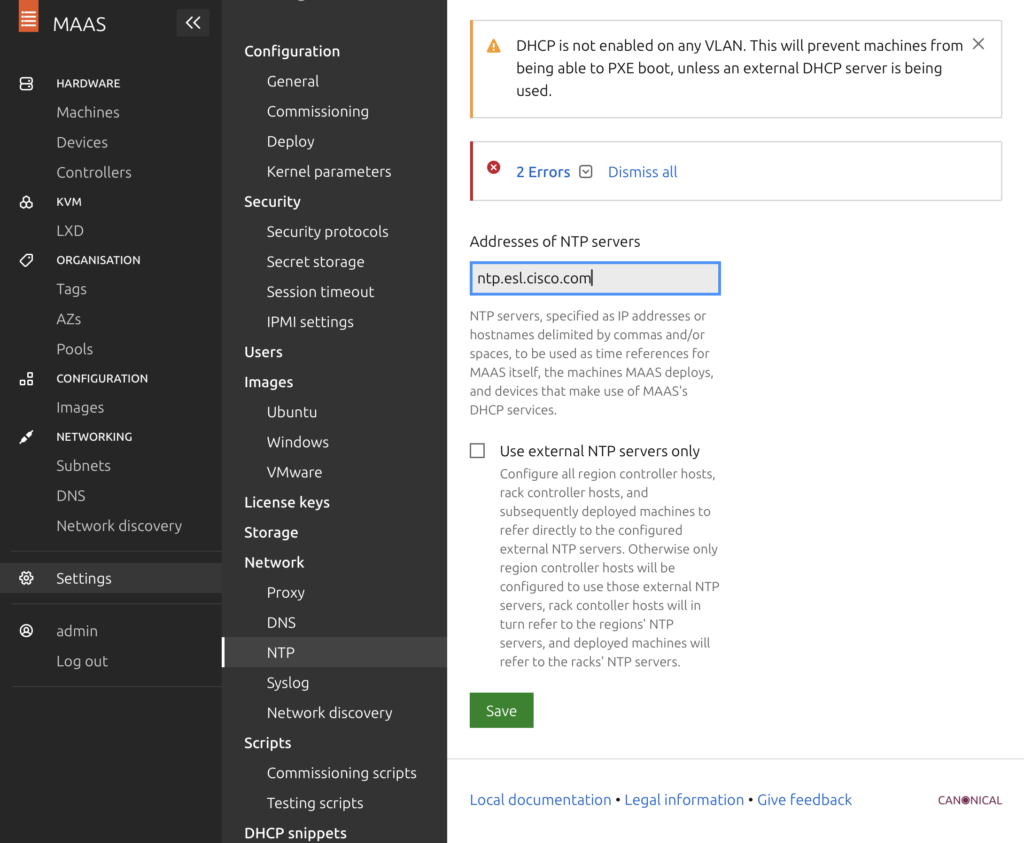
NTP Server
Go to Settings > Network > NTP. Use the default ntp.ubuntu.com or change it to your NTP server.
Select ‘Use external NTP servers only’. This is imported for the deployed machines to be configured with this NTP server.
DHCP on MAAS for Automatic PXE boot
DHCP configuration is the most important part because PXE boot replies on it. To configure DHCP, go to Configuration > Subnets. Click on the VLAN name (untagged in my case).
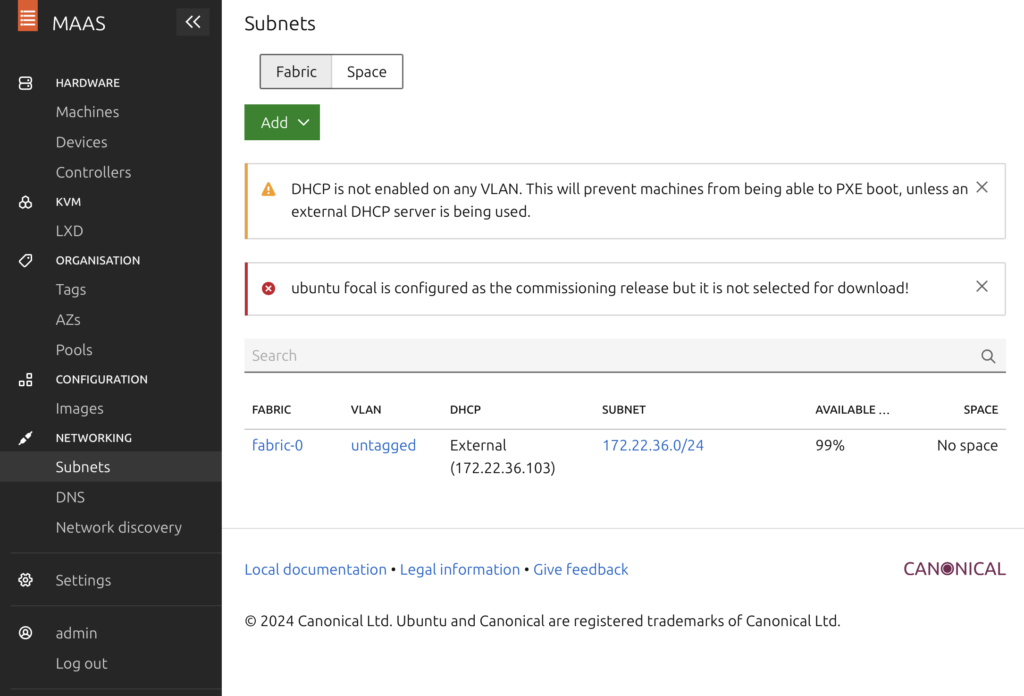
MAAS allows to use an external DCHP server (also known as DHCP relay). But I used MAAS built-in DCHP server.
Before proceeding, understand DCHP ranges. The following text is from MAAS forums (https://discourse.maas.io)
- Dynamic range: This range will be used during the commissioning or the enlistment stage. In particular, MAAS DHCP server will pick up an IP from this range to PXE boot the machine. Then, after the machine has been commissioned/enlisted:
- If you set the IP mode of the machine to DHCP: MAAS will pick up an IP within a dynamic range also for the other stages (like deployment and when the machine is powered on).
- If you set the IP mode to Auto-IP: MAAS will use an IP outside the dynamic ranges.
- When you set the IP mode to Static-IP: You can use any IP address you want outside the dynamic range (but you can use an IP within a reserved range.). If you try to use an IP within the dynamic range, you’ll get an error.
- Reserved range: MAAS will never assign IPs within this range in any case, unless you use the Static-IP mode and you assign the machine an IP within this range.
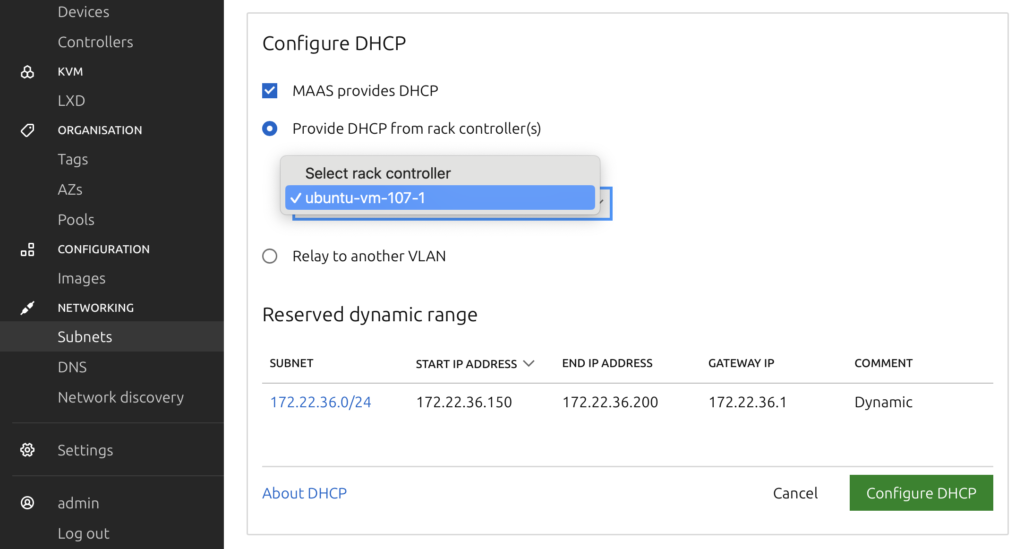
Scroll down ‘Reserved ranges’ section, click on ‘Reserve range’ drop down on the right, and select ‘Reserve dynamic range’.
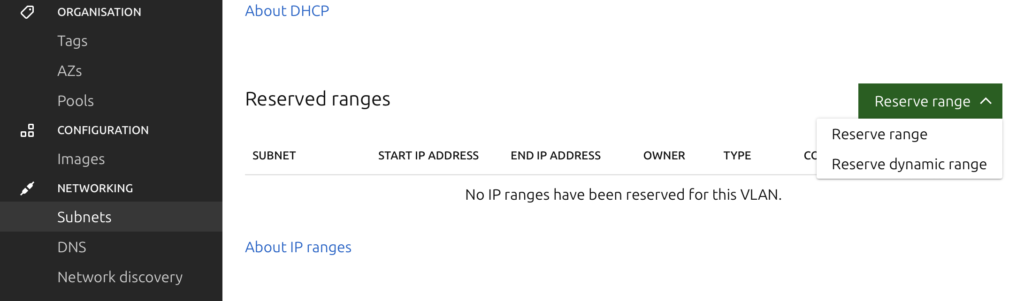
Enter a range that you don’t plan to use for other purpose.

DHCP Dynamic Range Size
This range must be large enough. In my earlier attempt, I had only five IPs assigned to this range, which wasn’t enough for MAAS to work.
When looking for logs, in /var/log/syslog, I saw the following messages
Feb 16 09:19:38 C220-M5SX-102 dhcpd[10380]: DHCPDISCOVER from 5c:fe:9e:0b:17:da via eno1: network vlan-1: no free leasesThis indicated that the range wasn’t enough. It happened because there were unrelated devices in my environment (like network switches, PDU, etc.) which were acting as a DCHP client. MAAS exhausted its Dynamic range on these devices leaving no free IP for the machine that I wanted to boot via MAAS. Increasing the Dynamic range (to 50 IPs) solved this issue for me. Checking the logs in /var/log/syslog confirmed that DCHP was going through it’s stages of DHCPDISCOVER, DHCPOFFER, DHCPREQUEST, and DHCPACK.
Next, click on Configure DHCP and use the local MAAS server as DCHP server.
This should be the final step.
Verification
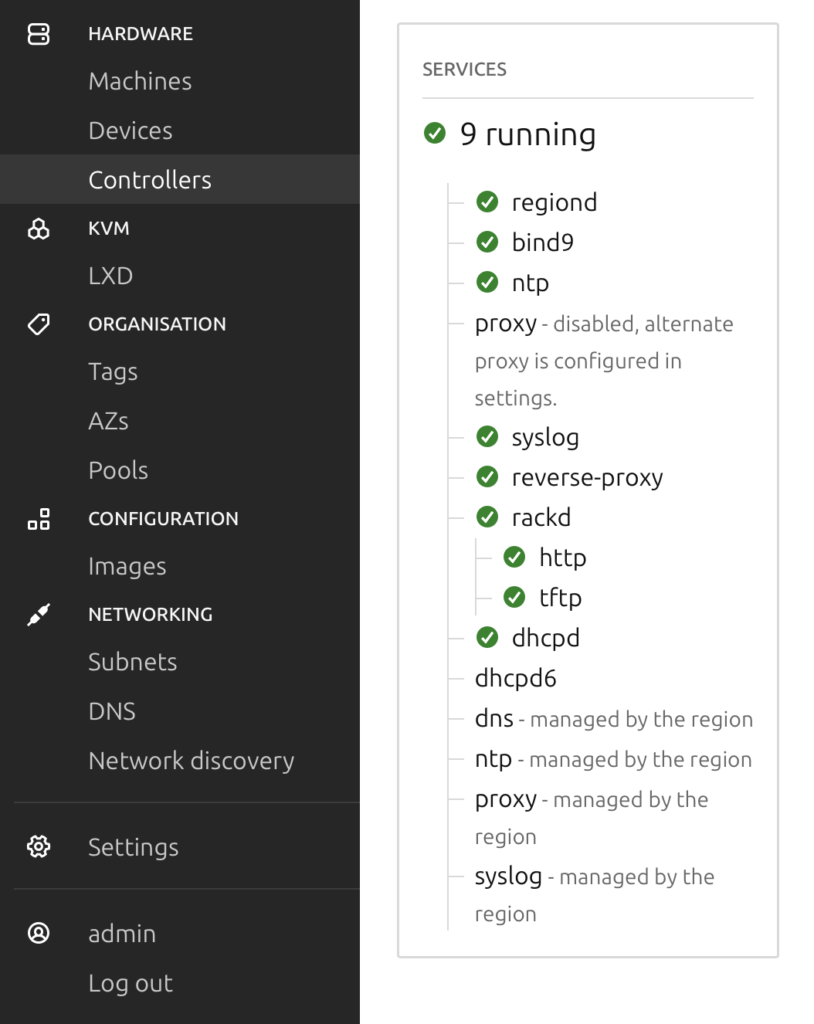
To verify, go to Controllers > Select the Controller. Verify that the services are running.
You can also verify MAAS using CLI.
paresh@ubuntu-vm-107-1:~$ sudo maas status
[sudo] password for paresh:
bind9                            RUNNING   pid 17548, uptime 20:10:35
dhcpd                            RUNNING   pid 115165, uptime 0:04:29
dhcpd6                           STOPPED   Not started
http                             RUNNING   pid 17860, uptime 20:10:16
ntp                              RUNNING   pid 17657, uptime 20:10:31
proxy                            STOPPED   Feb 24 03:14 PM
rackd                            RUNNING   pid 17552, uptime 20:10:35
regiond                          RUNNING   pid 17554, uptime 20:10:35
syslog                           RUNNING   pid 17798, uptime 20:10:21
paresh@ubuntu-vm-107-1:~$
MAAS Logs
More verification can be done in /var/log/syslog and in MAAS logs available at /var/snap/maas/common/log (for snap installation as used in this post) or /var/log/maas/ (for package installation).
Boot a Client Machine
Now that MAAS is installed and configured, the next step is to boot a client machine to install OS on it. This was the entire purpose of MAAS.
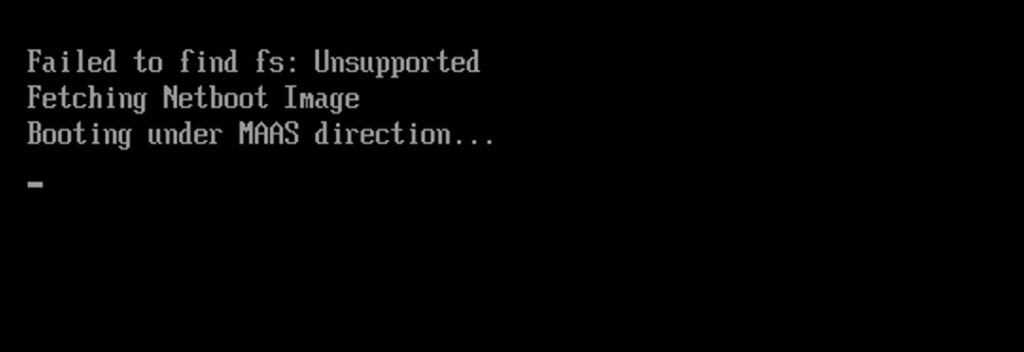
When the client machine (a VM in this case) boots for the first time, it should be able to get IP address from the MAAS DHCP server and start the enlistment. The client machine shows that it is booting under MAAS direction. As explained earlier, MAAS runs some scripts and shuts down the client machine.
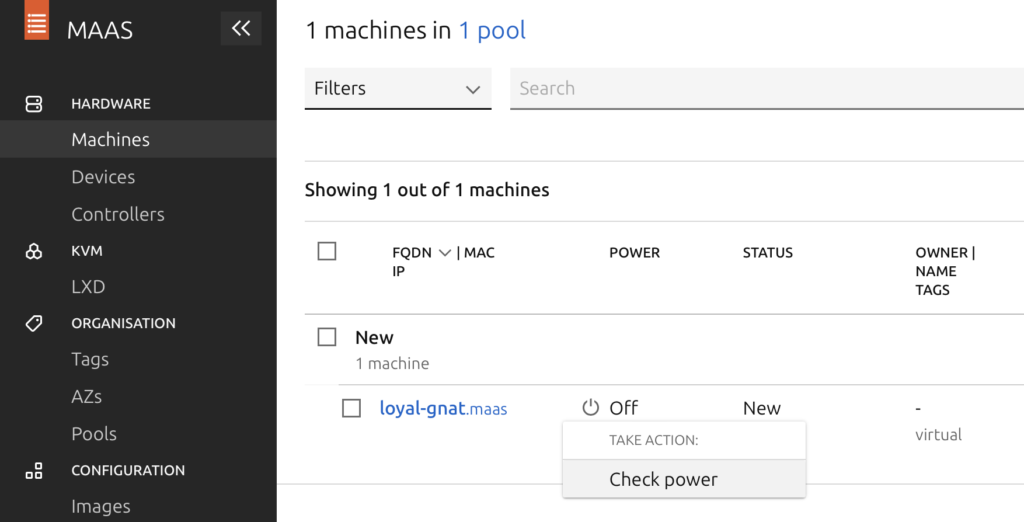
MAAS shows this client machine under Machines with a random name. This name can be changed, as will be done shortly.

When the client machine shuts down, its state should be New and Power state should be Unknown.
Allowing MAAS to Control Power of Client Machine
For allowing MAAS to control power of this client machine (VM), select it, click on Power type, go to Power Configuration and select Edit.
From Power type drop-down menu, select VMware. Enter VM Name, VMware IP, username, and password.

In VMware API protocol (optional), enter https+unverified. This is important to allow the connection without verifying the SSL certification. Without this, there would still be Power error because of
Failed to query node's BMC - (SSLCertVerificationError(1, '[SSL: CERTIFICATE_VERIFY_FAILED] certificate verify failed: unable to get local issuer certificate (_ssl.c:1007)'),)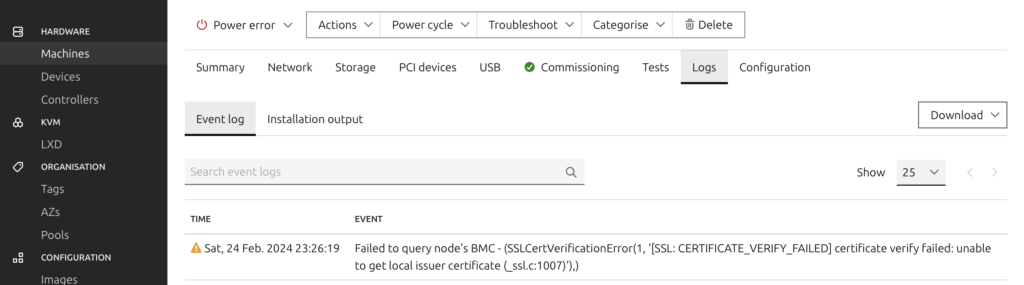
After making this change, under Machines, select drop down for Power and select Check Power. MAAS should now show Power status Off.
Next, for that machine, go to Actions and select Commission…
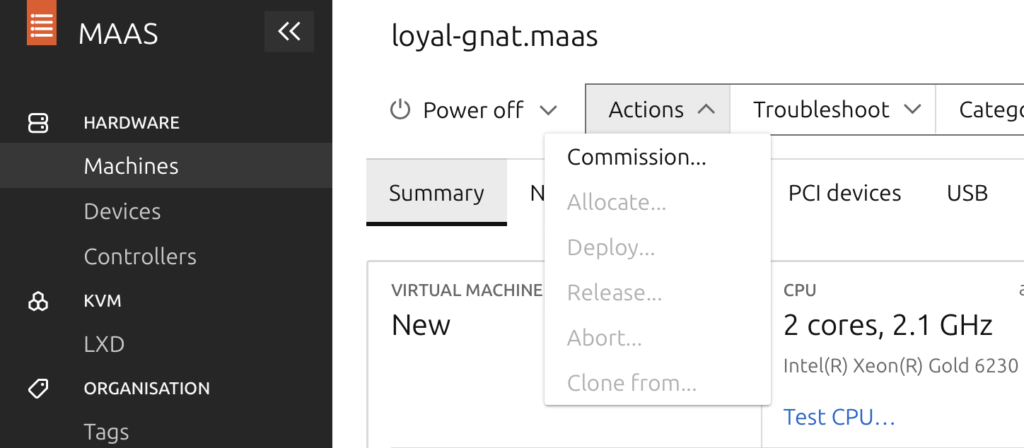
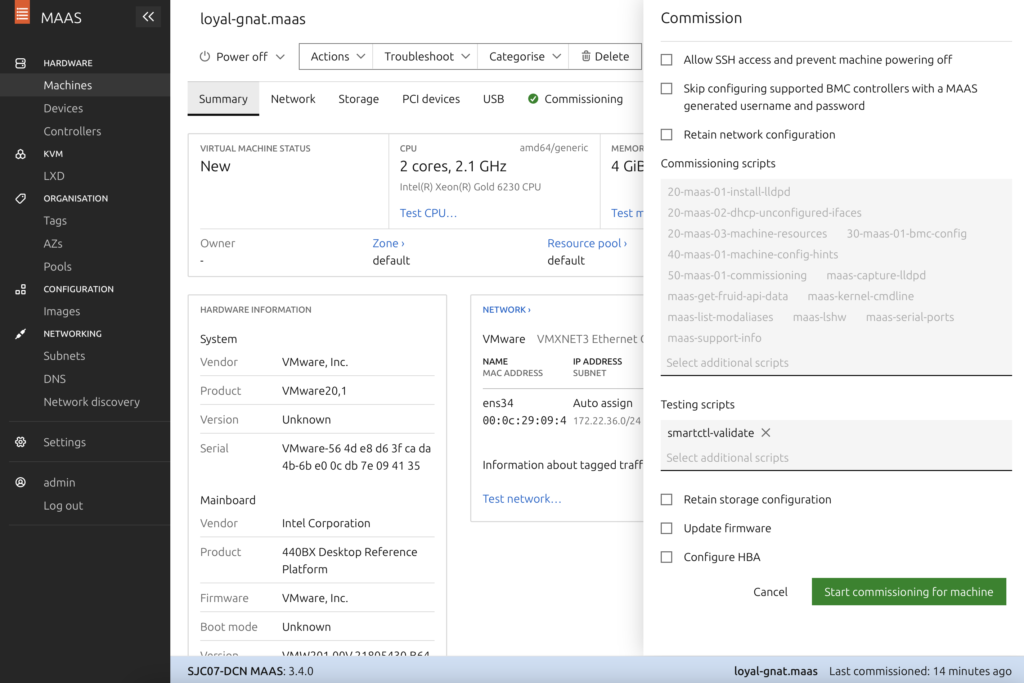
MAAS will boot the VM, run some scripts, and shut it down again. At this time, MAAS should show the status of this VM as Ready.
Manual Power
If for some reason, MAAS is unable to control power or credentials can’t be added to it, edit Power configuration and select Manual Power type. Then, power on the client machine manually. This means, power on the machine manually to bring it to New state. MAAS will shut it down. Then, Commission the machine from MAAS and manually turn it on. MAAS will bring it to Ready state and shut it down. Then one last time, power on the machine manually after clicking Deploy from MAAS.
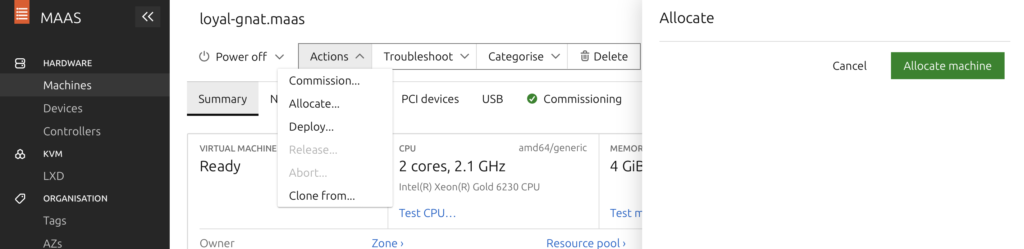
Allocate a Machine
Next, from the Actions drop-down menu, select Allocate. This should change the status to Allocated.
Deploy a Machine
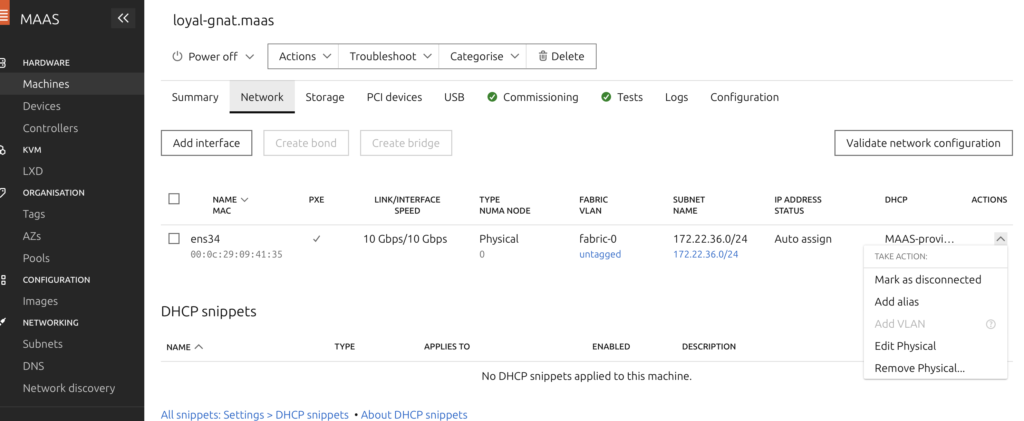
The final step is to deploy the OS (Ubuntu in this case) to the machine (VM). But before that, I wanted to give this machine a name and IP address of my own choice.
Assing Static IP to Machine
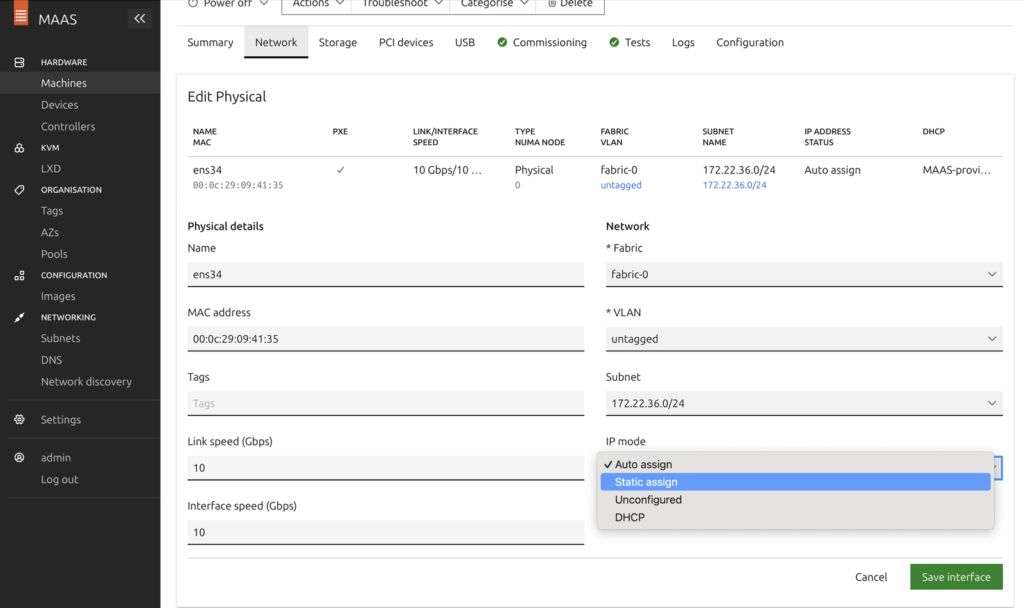
To assign the IP of my choice, select the machine > Network tab > select the Actions drop-down for the interface on the client machine > Edit Physical…
For IP mode, select Static assign and enter IP of your choice and select Save interface.
Changing the name of the deployed machine wasn’t possible using the GUI (at least I could not find). So I used MAAS CLI.
MAAS CLI to Change Machine Name
SSH to the MAAS-hosted machine and follow these steps.
paresh@ubuntu-vm-107-1:~$ sudo maas apikey --username=admin > maas_api_key
ciscouser@ubuntu-vm-107-1:~$ cat maas_api_key
md5z9N7mgBT5FnWgnd:Bxn6TMmqFsh2BkPBKU:XD3dV5xKgMBNzEPGsTyMWHs2rvNfHLtz
ciscouser@ubuntu-vm-107-1:~$ maas login admin http://172.22.36.80:5240/MAAS/api/2.0/ < maas_api_key
API key (leave empty for anonymous access):
You are now logged in to the MAAS server at

http://172.22.36.80:5240/MAAS/api/2.0/ with the profile name 'admin'.

For help with the available commands, try:

  maas admin --help

paresh@ubuntu-vm-107-1:~$
The output of the MAAS CLI is in JSON format. Download jq (if not already) to parse it.
paresh@ubuntu-vm-107-1:~$ sudo apt install jq -y

paresh@ubuntu-vm-107-1:~$ maas admin machines read | jq '.[] | .hostname, .system_id'
"loyal-gnat"
"macfar"
ciscouser@ubuntu-vm-107-1:~$
Here, loyal-gnat is the machine name as shown on the GUI and macfar is the system_id.
To update the machine name,
ciscouser@ubuntu-vm-107-1:~$ maas admin machine update macfar hostname=ubuntu-vm-101-1After this change, GUI should show the machine name as ubuntu-vm-101-1.
See MAAS CLI advanced tasks and MAAS Common CLI tasks.
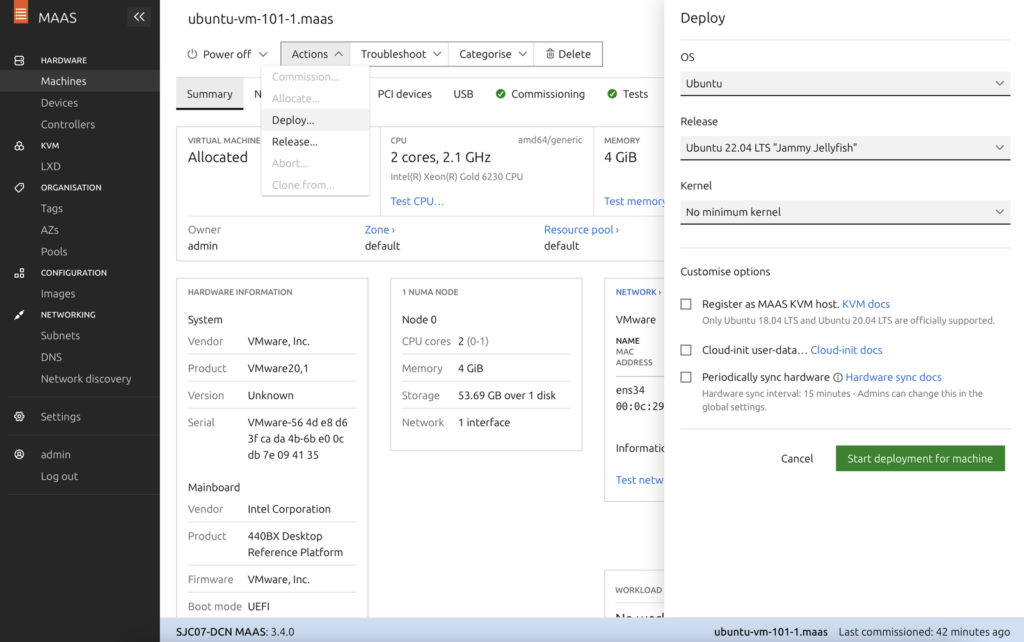
Finally, on MAAS GUI, go to Actions and select deploy.
Client Machine
When MAAS deploys ubuntu on a machine, login is allowed only from the MAAS-hosted server using the username ubuntu. Password is not needed because of SSH keys, which were installed using MAAS GUI. MAAS also disabled password-based login.
To create users and allow login to the newly deployed Ubuntu server, take the following steps:
- Login to the new Ubuntu machine using username ubuntu from the MAAS-hosted server. Login from any other machine is not allowed.
- Create a new user and password.
- Allow password-based login by changing PasswordAuthentication from no to yes in /etc/ssh/sshd_config.d/60-cloudimg-settings.conf
See following steps for clarity.
paresh@ubuntu-vm-107-1:~$ ssh ubuntu@172.22.36.82

ubuntu@ubuntu-vm-101-1:~$
ubuntu@ubuntu-vm-101-1:~$ sudo useradd ciscouser -s /bin/bash -m
ubuntu@ubuntu-vm-101-1:~$ sudo passwd ciscouser
New password:
Retype new password:
passwd: password updated successfully
ubuntu@ubuntu-vm-101-1:~$
ubuntu@ubuntu-vm-101-1:~$ sudo usermod -aG sudo ciscouser
ubuntu@ubuntu-vm-107-1:~$ cat /etc/ssh/sshd_config.d/60-cloudimg-settings.conf
PasswordAuthentication no
ubuntu@ubuntu-vm-107-1:~$ sudo sed -i 's/no/yes/' /etc/ssh/sshd_config.d/60-cloudimg-settings.conf
ubuntu@ubuntu-vm-107-1:~$ cat /etc/ssh/sshd_config.d/60-cloudimg-settings.conf
PasswordAuthentication yes
ubuntu@ubuntu-vm-107-1:~$
ubuntu@ubuntu-vm-107-1:~$ sudo systemctl restart sshd
Now login to the new Ubuntu server from anywhere using the newly created user account.
That’s all about using MAAS for Automatic PXE boot of client machines.